Industrial Training with live Projects

What is the meaning of Industrial Training with live projects? These days all students who are pursuing technical degree they are searching for Industrial Training with Live Projects. So Multiple option is there with all students like they can go for some IT company or they can go for an institute. So as per our preference, all students should go for IT company instead of an institute.

Click here for Training Enquiry

Nevino systems private limited is an Information Technology company situated in Ambala Cantt who is providing best industrial training with live projects.They are providing a good environment to students and also provide nice and genuine projects to students.

Nevino systems private limited is an experienced software company in all aspects. They provide the industrial training to students of MCA / B.Tech / M.Tech / BE/ BCA/ MBA plus more technical fields thus they plays an important role in student’s professional career. They give them full exposure of working in a software company’s environment so that they can implement their knowledge what they have learned in their studies practically in the real working situation.

Training aspects: So for all types of Industrial Training student should contact to IT company. Below are few one which has been provided in IT company. Here training consists of 6 Weeks/ 6 months in which students can opt for training in any language as per study requirements like:

•  PHP MYSQL
•  .NET MYSQL
•  .NET SQL Server
•  Oracle
•  Java MySQL
•  Web Designing
•  Software Testing
•  SEO/SMO
•  Networking
•  Android Applications
•  ERP/SAP Training
•  Accounting Training
•  HR

Click here for Training Enquiry

* The Content stated above is for informational purpose only. Expert Software Team is not responsible if any part of content found meaningless in any manner or condition.

Introduction of Nevino HR Software

Nevino Human Resources Software: Human Resources is the backbone of every organization. So, it becomes necessary to use human resources perfectly. To achieve this goal Nevino HR software is equipped with complete solution for all types of organizations. This software is developed by Nevino Systems Private Limited situated in Ambala(Haryana). The basic features of Nevino HR Software are as follows: –

Click Here To Buy Nevino HR Software

introduction-of-nevino-hr-software-1-2.png

  • Easily mark the Employee attendance.
  • Edit Employee details in few steps.
  • User-friendly interface of Nevino HR Software.
  • Administrator password authentication system.
  • Separate Username and Password for every employee.
  • Maintains the old and new record of employees.
  • Enter Salary, allowances and deduction in one click.
  • Online accessibility of software is available.
  • Facility to take daily back up of the database.

* The Content stated above is for informational purpose only. Expert Software Team is not responsible if any part of content found meaningless in any manner or condition.

How to edit Employee in Nevino HR Software

After saving the employee details in nevino hr software it is possible to edit details of employee in an easy way. In this blog we will learn how we can edit the employee details in nevino hr software.

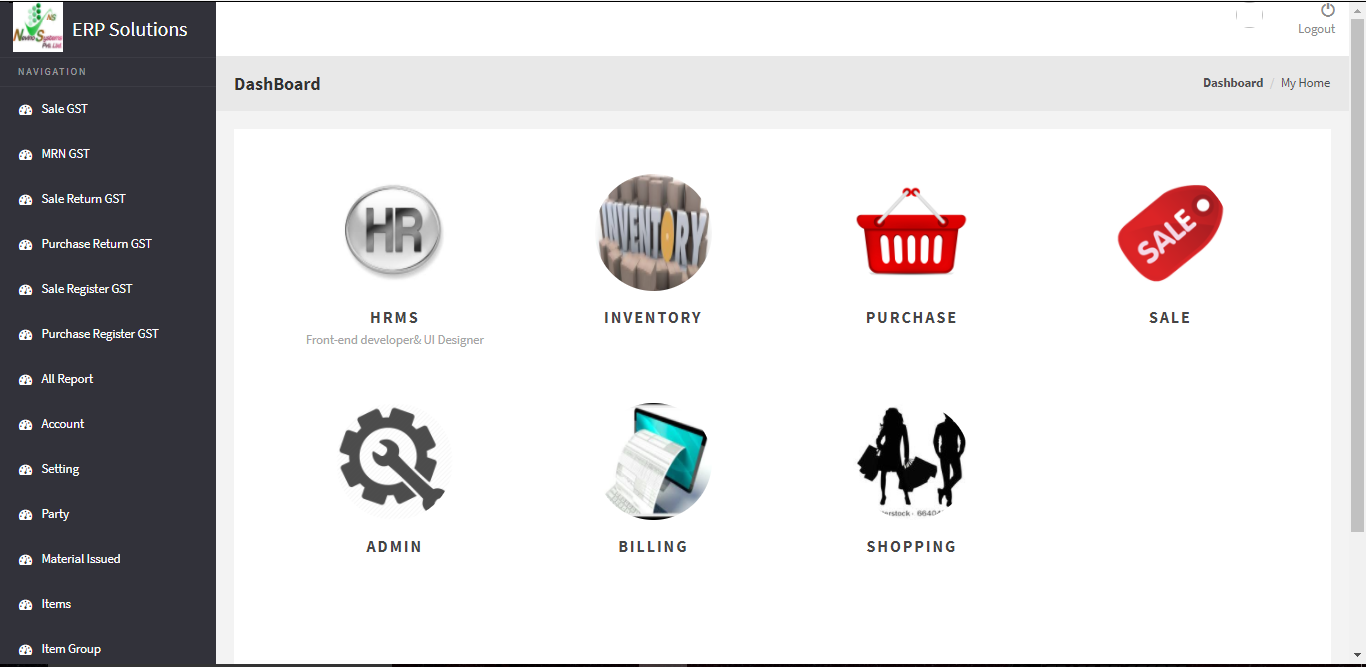
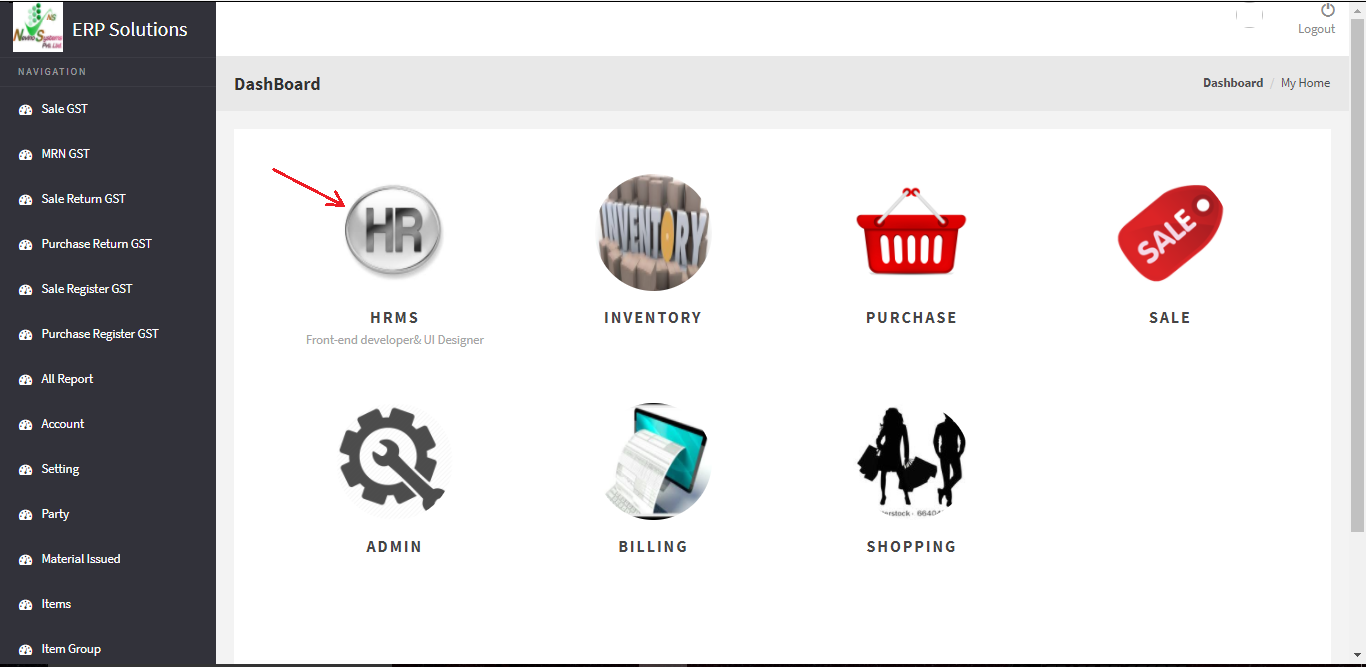
Step 1.On the main window of Nevino HR Software click on ‘HR’ icon as indicated in image below.main hr dashboard

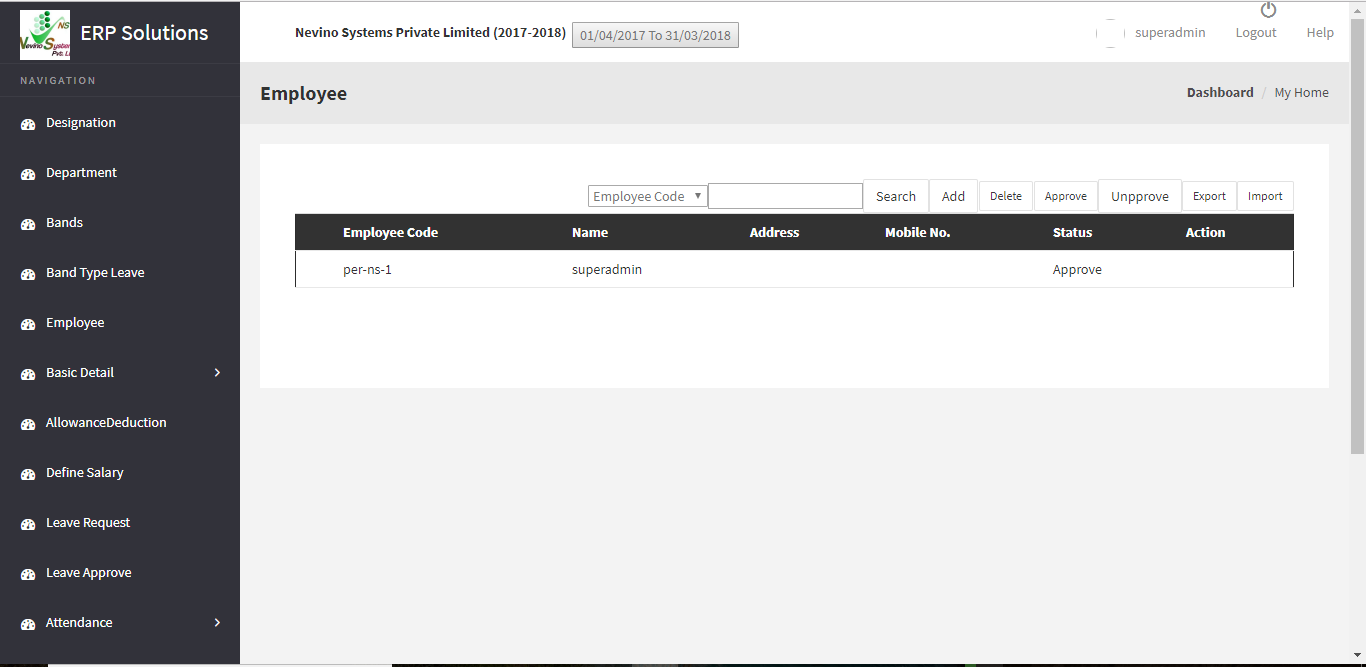
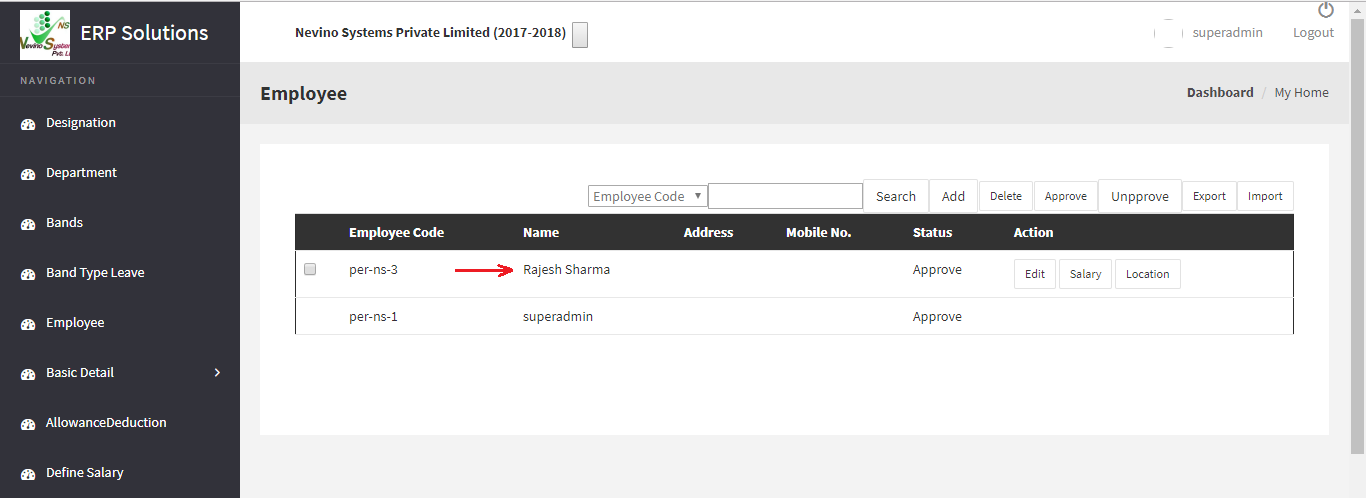
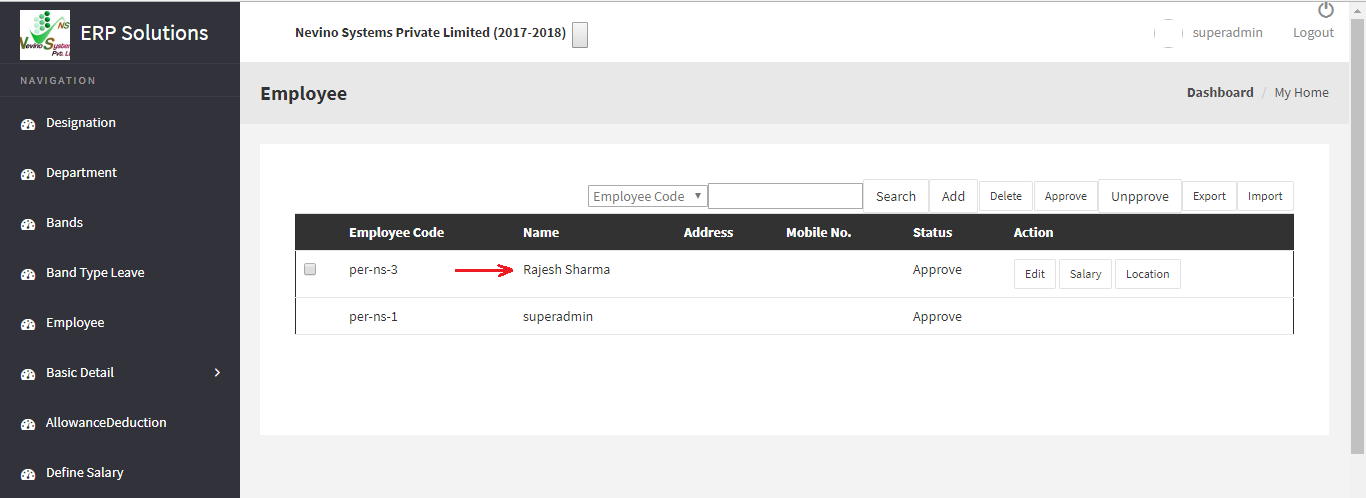
Step 2. When ‘HR’ icon is clicked ‘Employee’ main window will appear where we can see the name of employee appearing.hr employee window

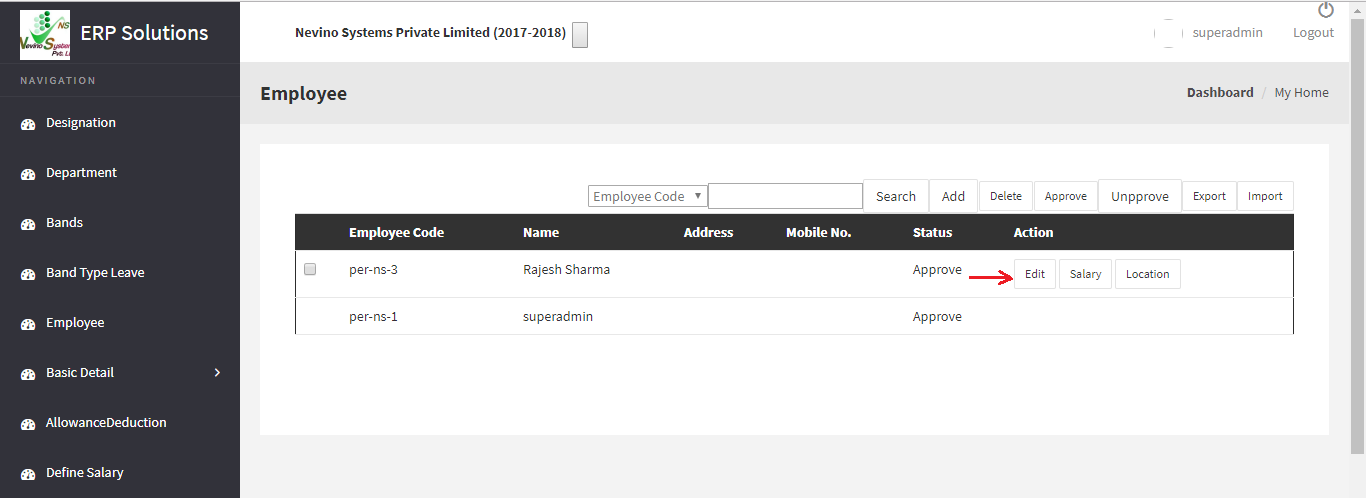
Step 3. Now click on ‘Edit’ button as indicated in image below.hr employee edit button

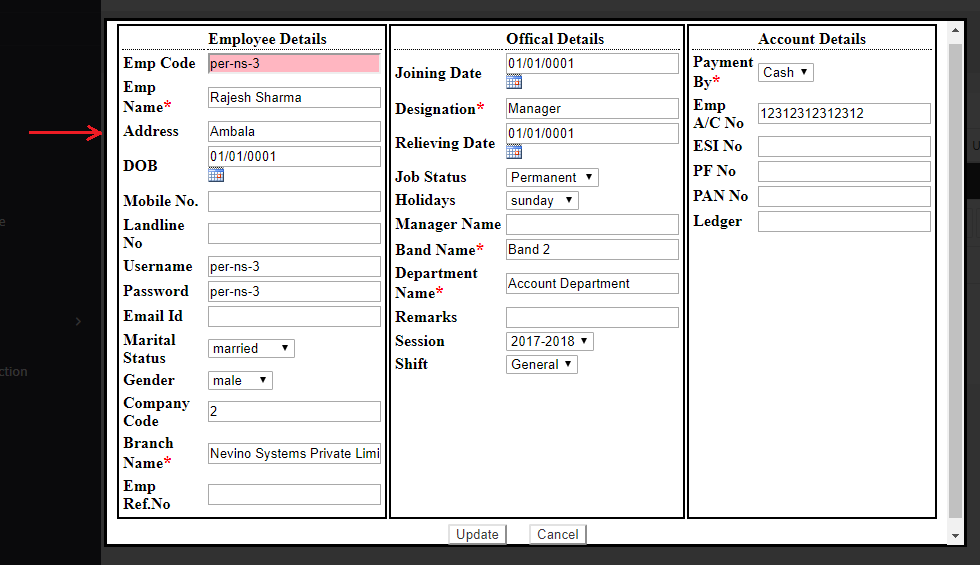
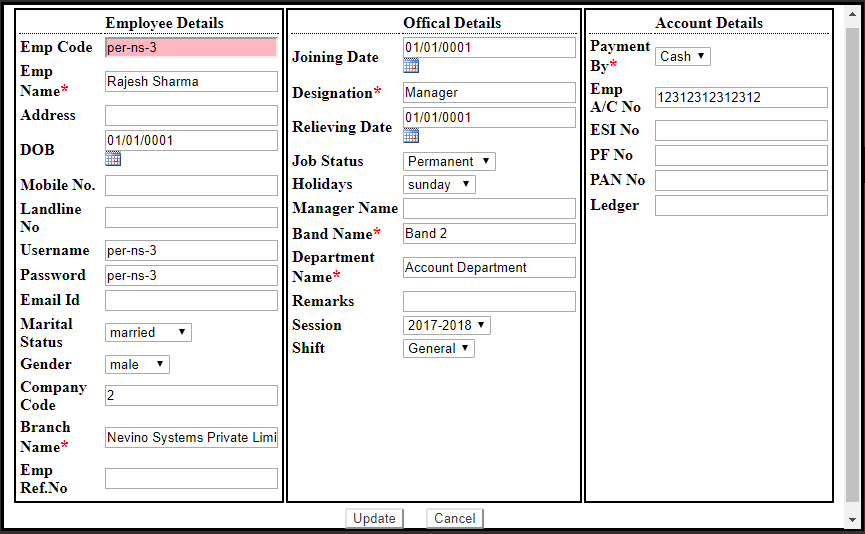
Step 4.When ‘Edit button is clicked a window as below will appear where you can change any details if required.hr employee details

Step 5. For example, we want to enter address as ‘Ambala’ as shown in image below.hr employee address

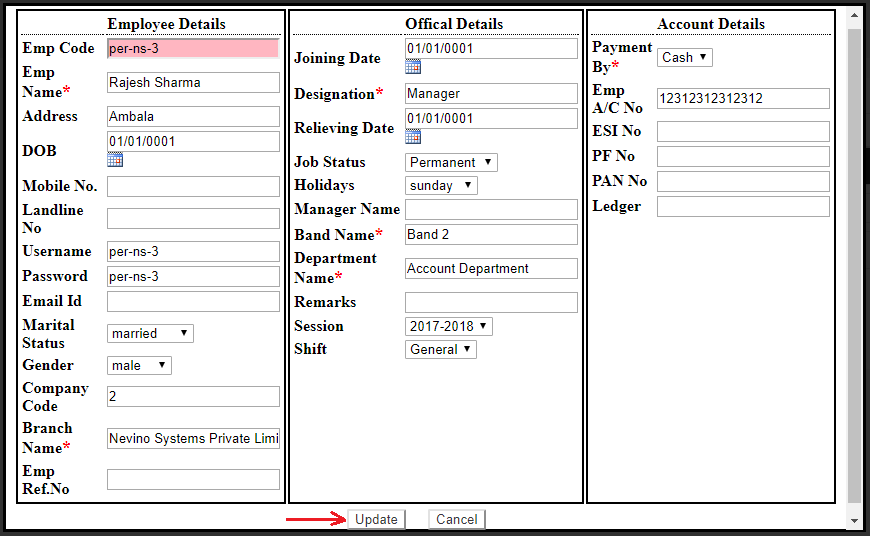
Step 6. To save the newly added details of employee click on ‘Update’ button as indicated below.hr employee update

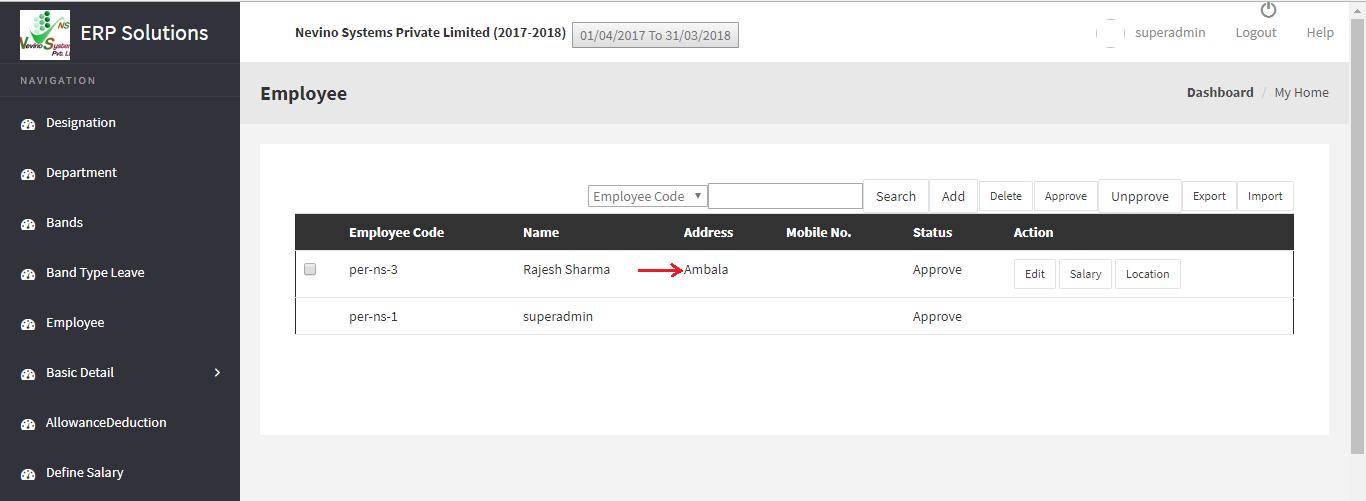
Step 7. When ‘Update’ button is clicked data will be saved and on main window of employee address will also appear with employee name as shown in image below. In this way we can edit the details of employee.hr employee main screen

* The Content stated above is for informational purpose only. Expert Software Team is not responsible if any part of content found meaningless in any manner or condition.

How to install Nevino Lab Software

Nevino Lab Software is the perfect software to work in labs. Moreover, it is easy to install in the computer. Below are the steps on how to install nevino lab software.

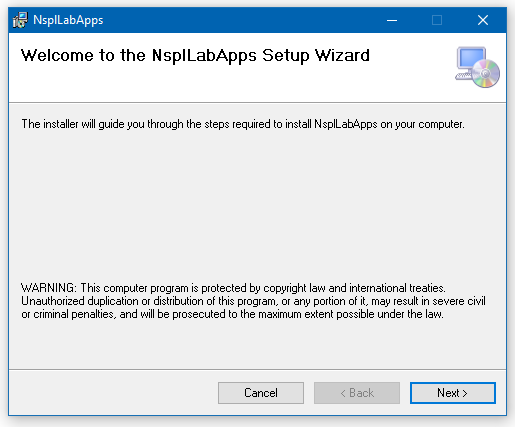
Step 1.When we open the folder named as ‘NevinoLabSoftware_setup’ we will see two files inside it as shown below.
blog folder window

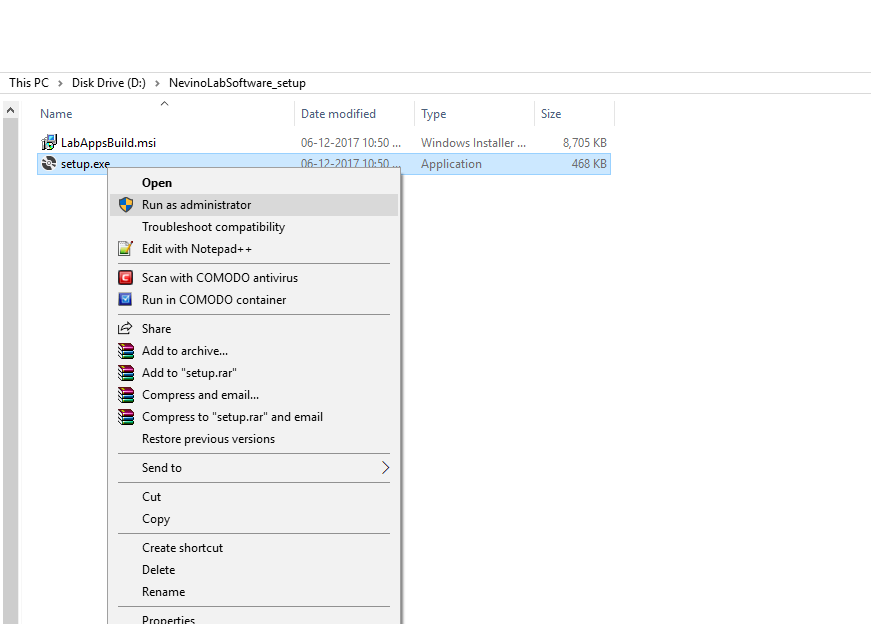
Step 2. Now right click on ‘setup’ icon, drag to ‘Run as administrator’ and then click on it.
right click setup file

Step 3.On click of ‘Run as administrator’ a new screen as below will appear where you have to click on ‘Next’ appearing below on the screen.
blog setup starts

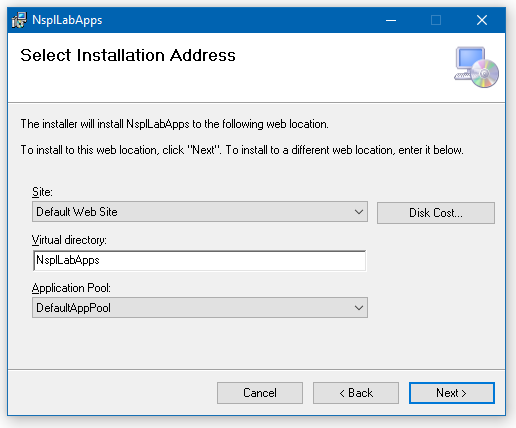
Step 4.When window as below appears again click on ‘Next’.
blog setup second screen

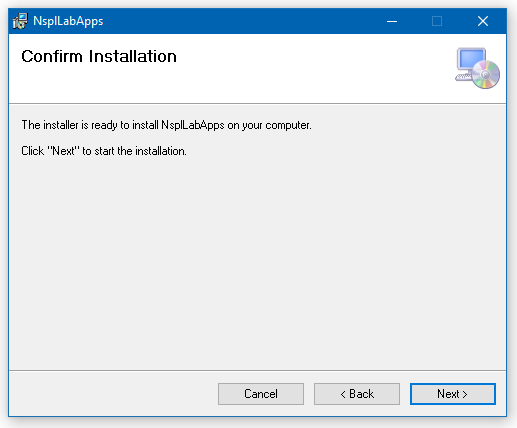
Step 5. This is ‘Confirm Installation’ window where you must again click on ‘Next’ appearing on below right corner of the screen.
blog setup installation screen

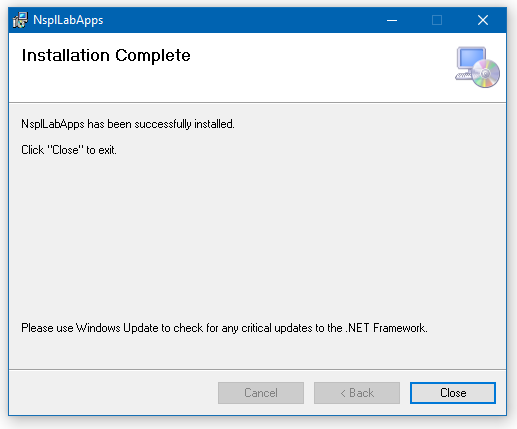
Step 6.Now the installation process will start and when it completes window as below will appear. It shows that Nevino Lab Software is successfully installed. Click on ‘Close’ to shut down the window.
blog setup installed

Step 7. After installation we will open the software on internet browser by typing ‘localhost/nspllabapps’ as shown below.
blogbrowser window

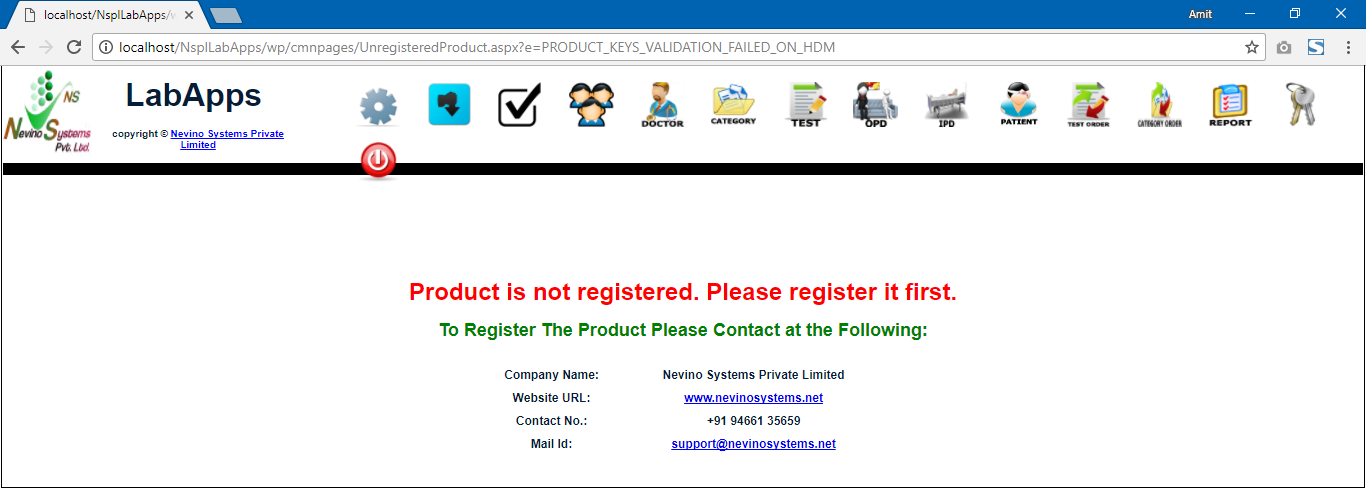
Step 8. After typing ‘localhost/nspllabapps’ click enter you will get following error as shown below in the image. It shows that you must register your product by contacting at below mentioned contact information.

* The Content stated above is for informational purpose only. Expert Software Team is not responsible if any part of content found meaningless in any manner or condition.

How to download Nevino Lab Software

Nevino Lab Software is now easily available online to download at easy steps. Please follow below mentioned steps on how to download nevino lab software.

Step 1. Click on the following link:-
http://blog.expertsoftwareteam.com/introduction-of-nevino-lab-software

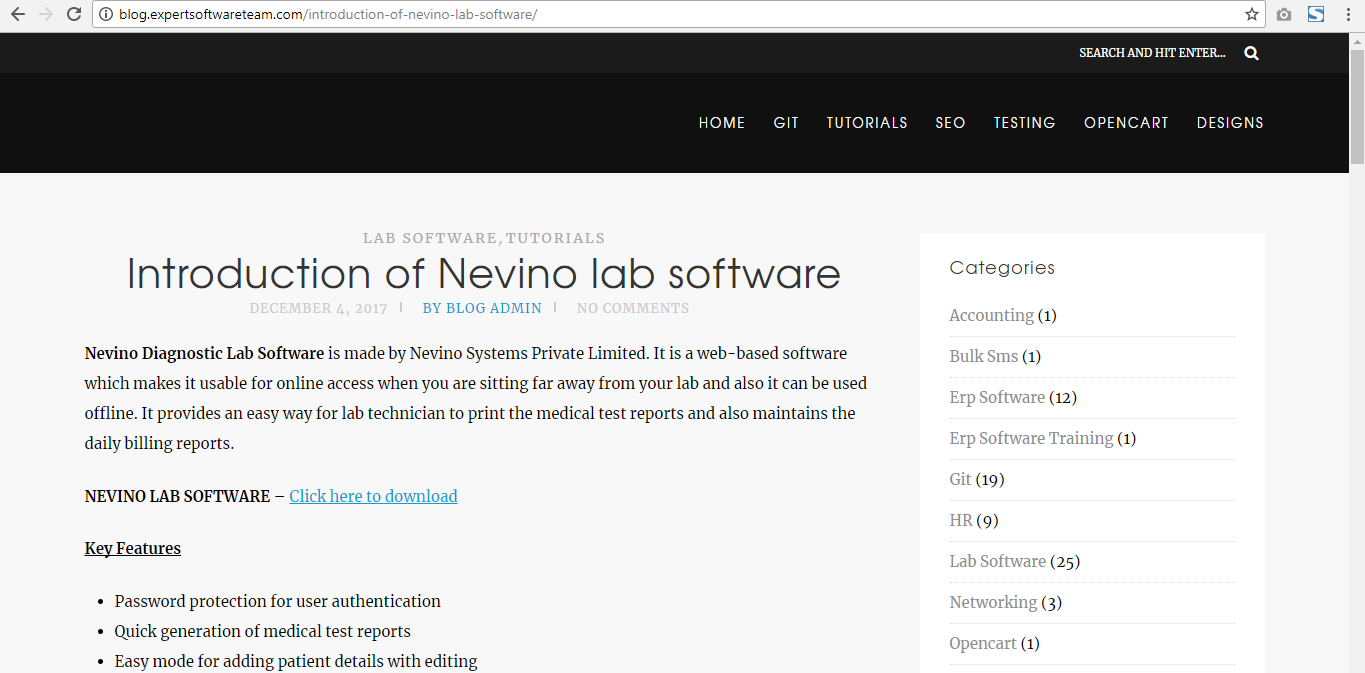
Step 2.You will reach the website page as shown below.
blog website page

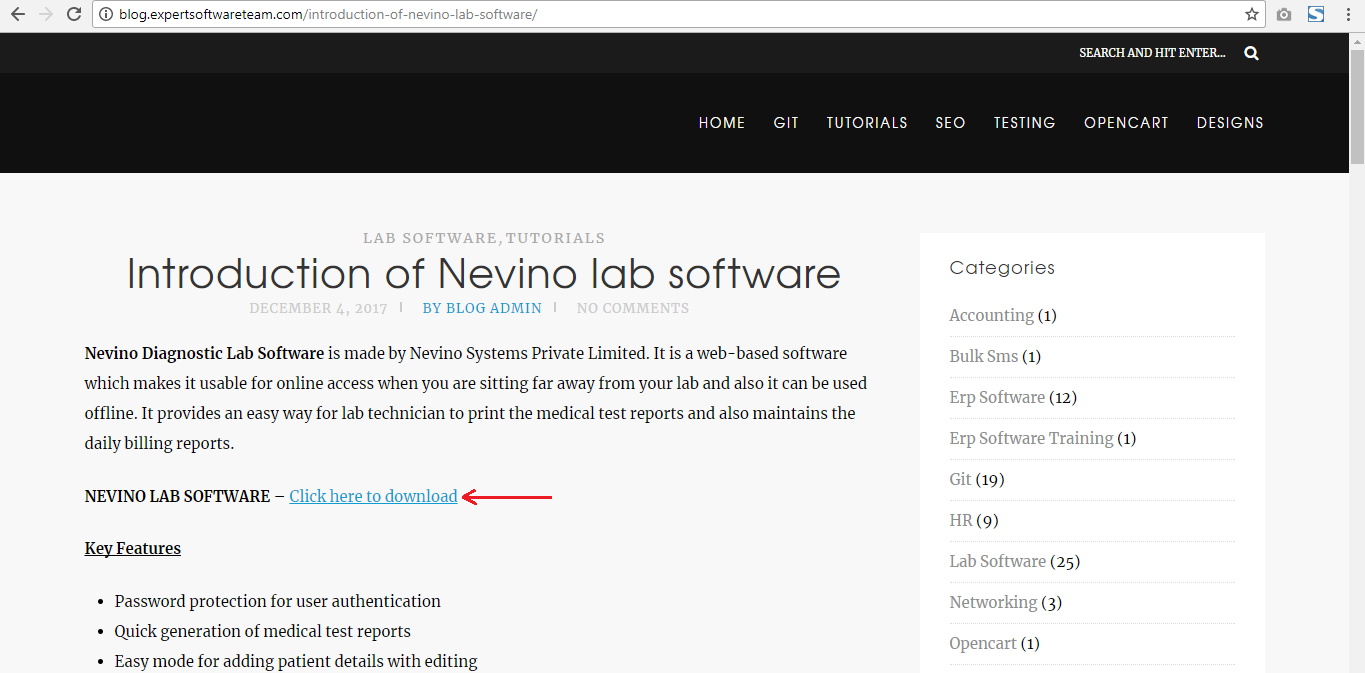
Step 3. Now click on the link ‘Click here to download’ as indicated in the image below.
blog download link
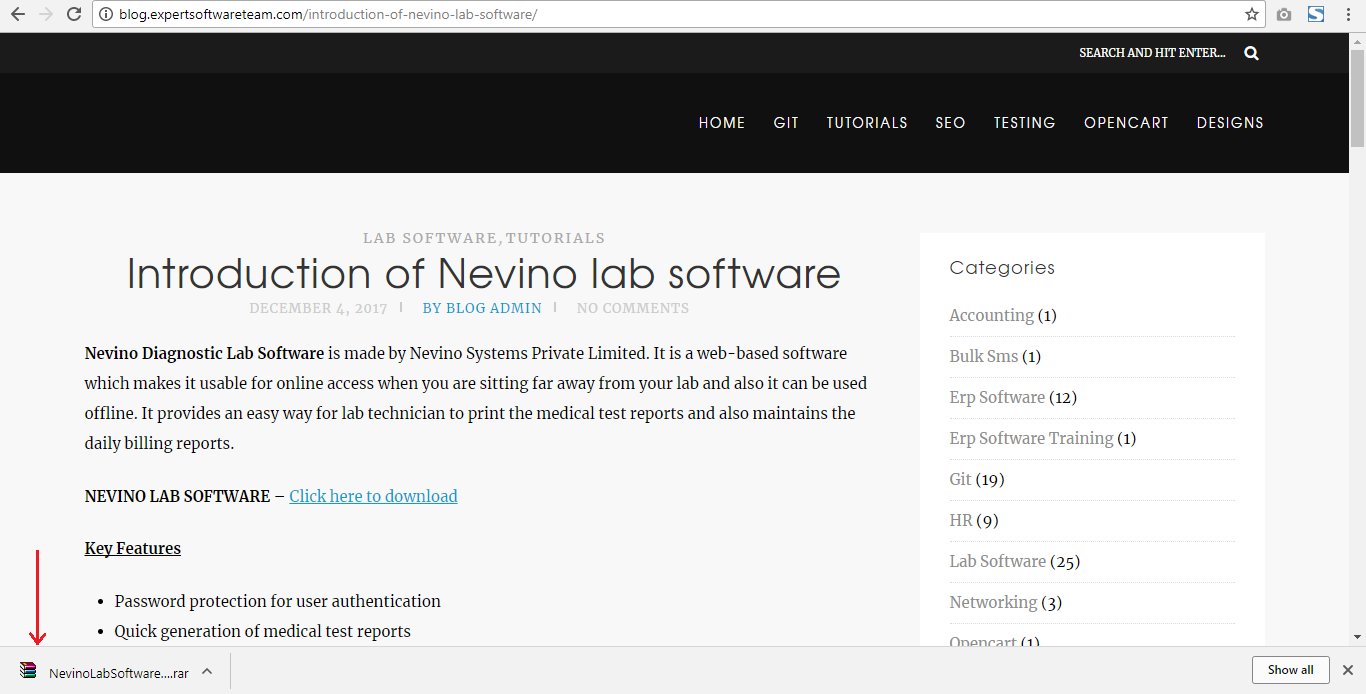
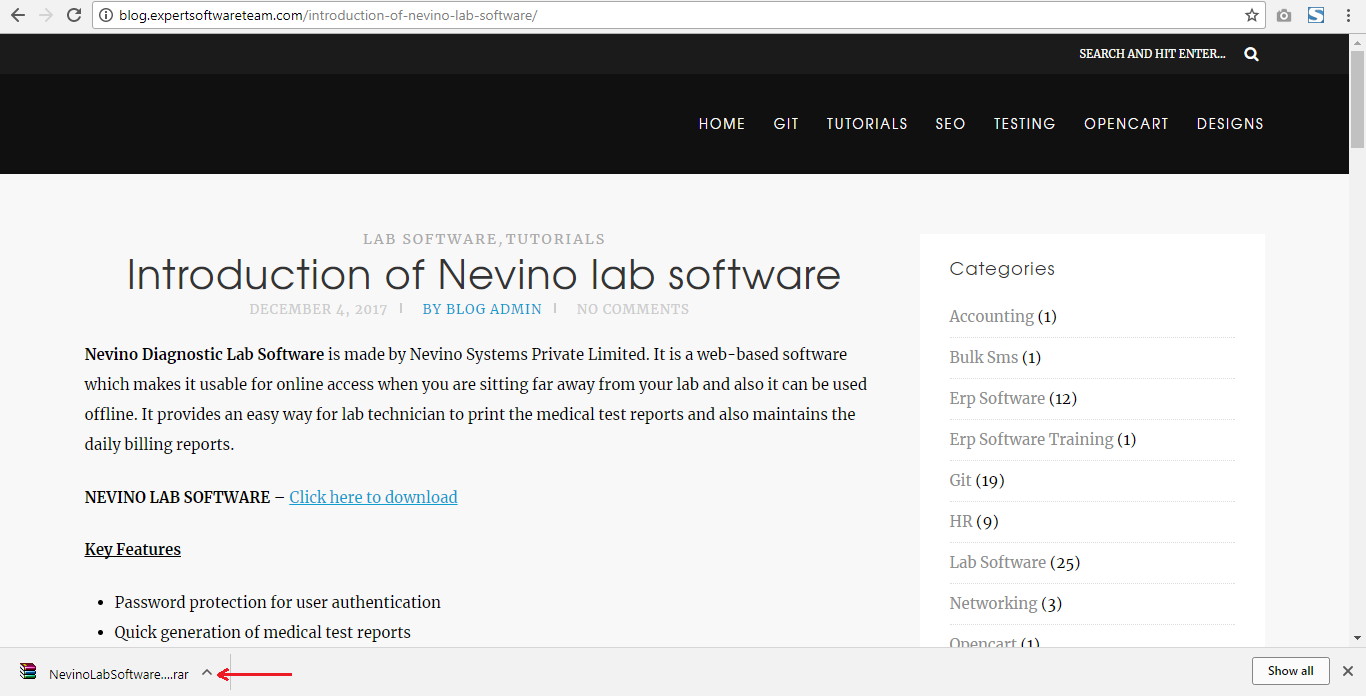
Step 4. On the click of this link file will start download automatically. For example, if we are using chrome browser then after download file will look like as shown in image below.
blog file downloaded

Step 5.Now drag your cursor to the arrow and click on it as indicated in the image below.
blog select file

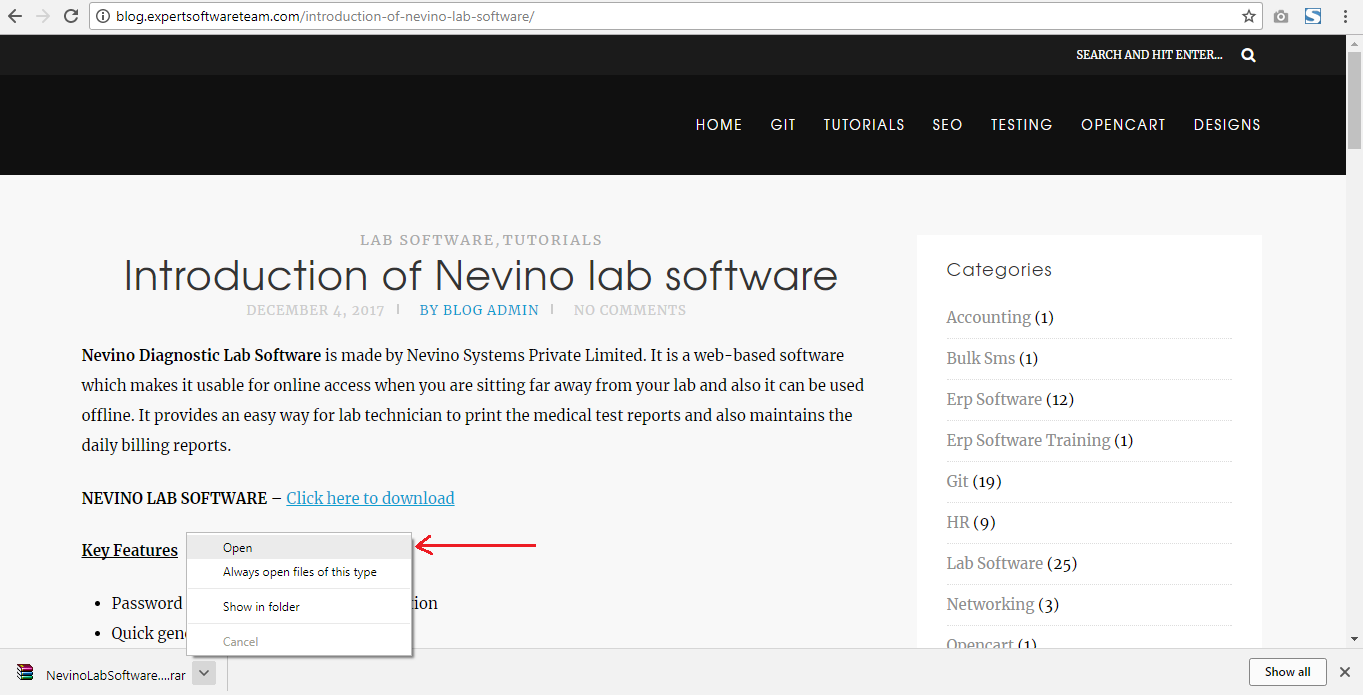
Step 6. By clicking on the arrow a list will open where you must drag your cursor to ‘Open’ as indicated in screen shot below.
blog open selected file

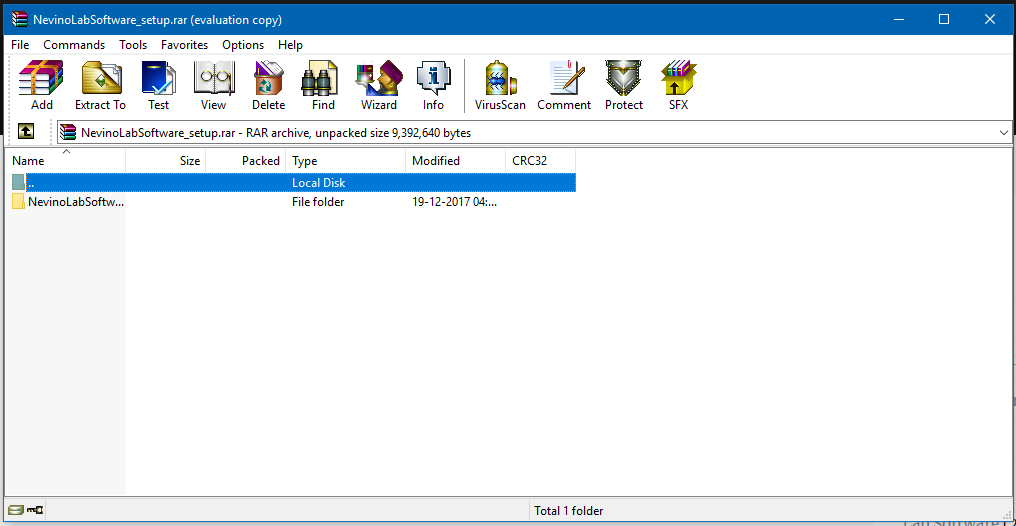
Step 7. As this is a ‘.rar’ file so by clicking on ‘open’ a new window will open as shown below.blog winrar screen

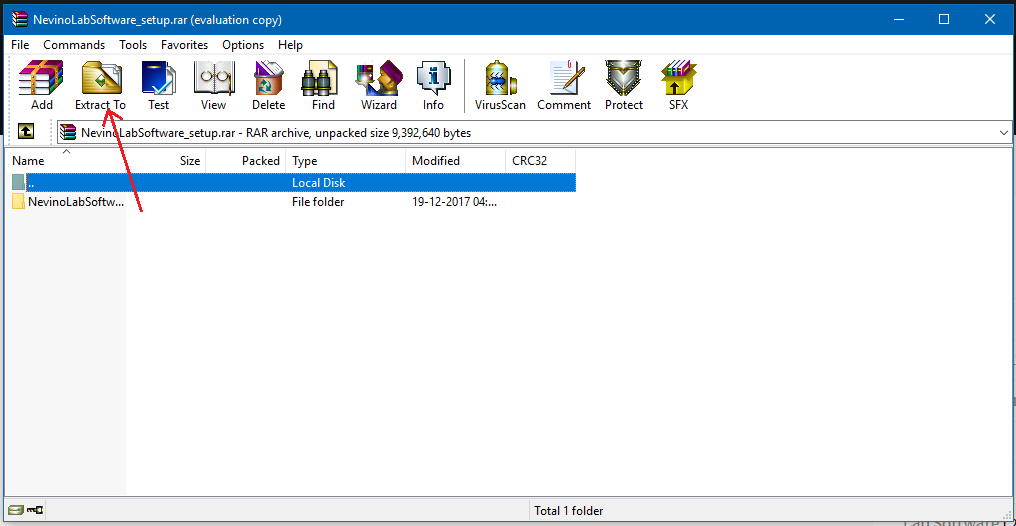
Step 8. Click on ‘Extract To’ as shown in image below.
blog winrar extract button

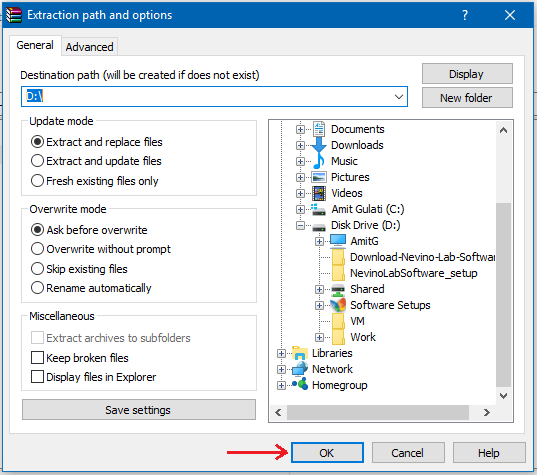
Step 9. A new window as below will open where you have to define path for the folder to be extracted. For example, we have given ‘D:\’ and then we will click on ‘OK’.
blog extract window

Step 10. On click of ‘OK’ button folder named as ‘NevinoLabSoftware_setup’ will be extracted to ‘D drive’ as shown below.
blog folder extracted in drive

Step 11. Now double click on the folder to open it then two files inside the folder will be shown as below. This shows that Nevino Lab Software is successfully downloaded. Please click on link below to know how we can install the nevino lab software.blog folder open

<< Already gone through >>How to install Nevino Lab Software

* The Content stated above is for informational purpose only. Expert Software Team is not responsible if any part of content found meaningless in any manner or condition.
How to add Employee in Nevino HR Software

Employee is the major part of an organization whose information is very important. In Nevino HR Software adding an employee is very user friendly. So please follow below mentioned steps to know how we can add employee in nevino hr software.

Step 1. We will start from the main screen of Nevino HR Software where you must click on ‘HR’ icon shown as below.
main hr window

Step 2.On the click of ‘HR’ icon ‘Employee’ main window will open by default as per below image. Here you can see employee name as ‘superadmin’ which is by default in this software.
hr employee main screen

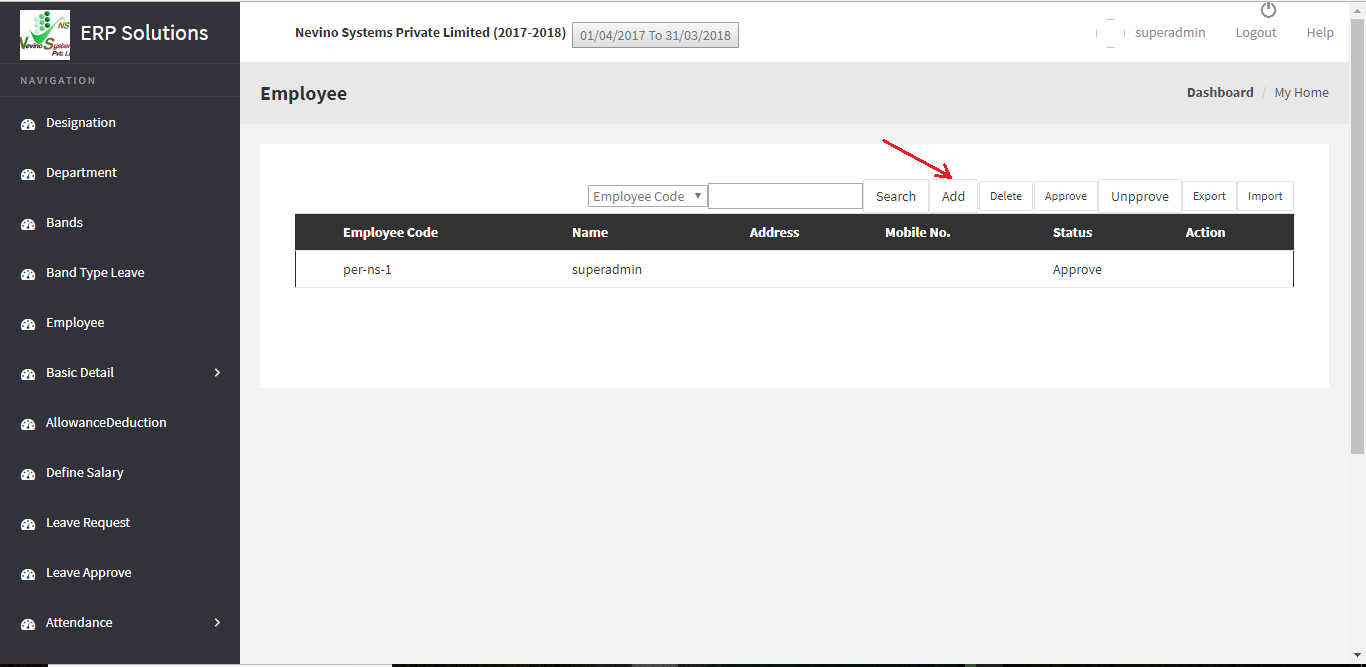
Step 3. Now click on ‘Add’ button as indicated in image below to add an employee.
hr employee add button

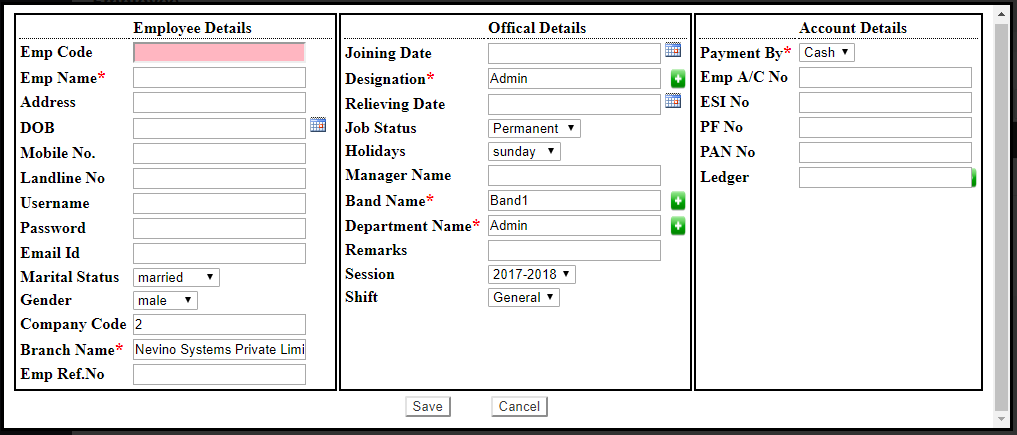
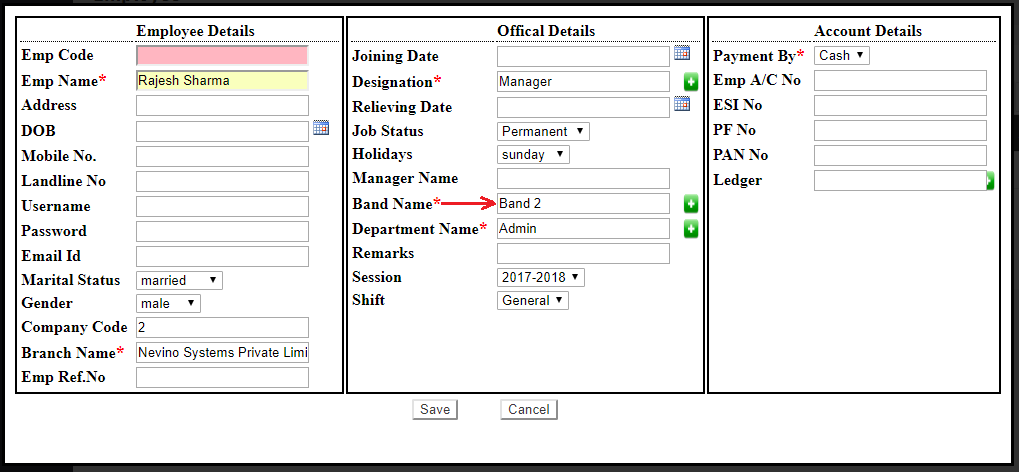
Step 4.On click of ‘Add’ button a new window as below will appear where you can see three columns ‘Employee, Official & Account details’ and we will start from employee details.
hr employee add deatails

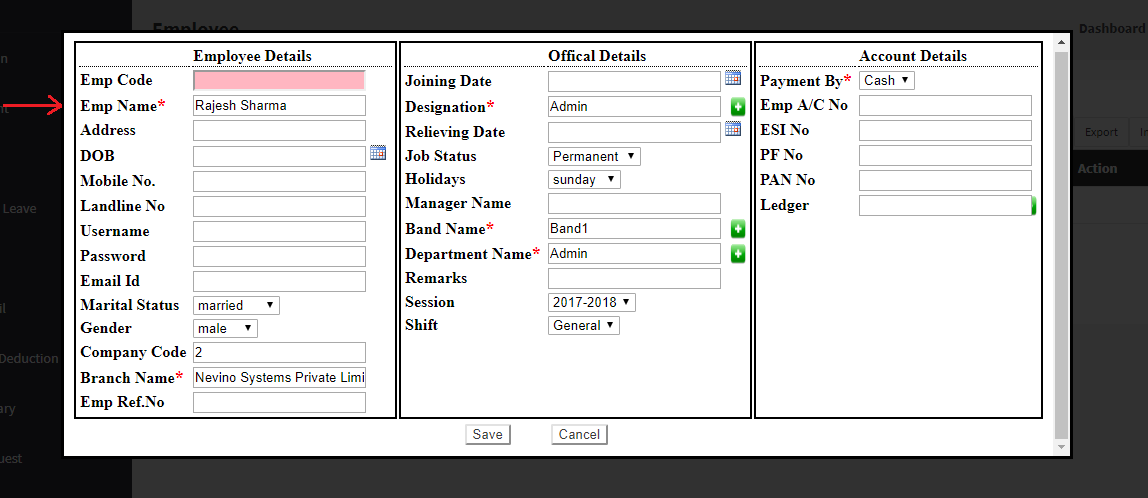
Step 5. The headings with * symbol are compulsory to add, so first we will add Employee name as shown below.
hr add employee name

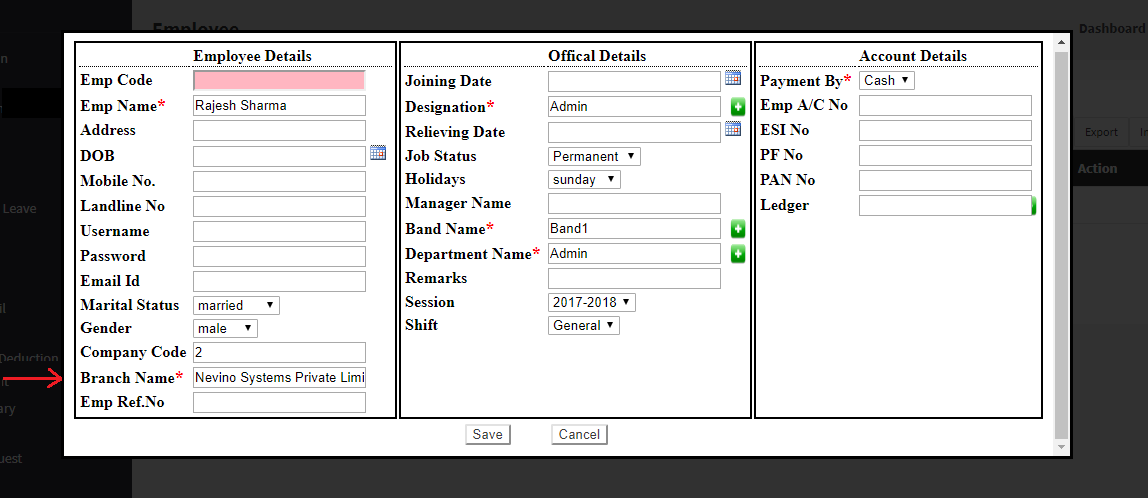
Step 6. Next box is Branch Name where you can enter company’s name, by default ‘Nevino Systems Private Limited’ is displaying inside the box in the image below.
hr add branch name width=

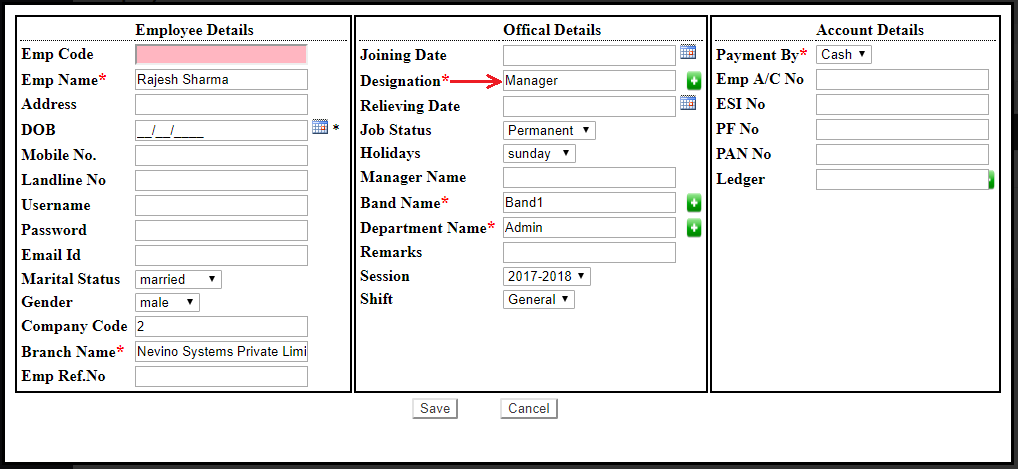
Step 7. Next box is ‘Designation’ where we will enter the designation name as ‘Manager’ as shown in image belowe.
hr add employee designation

Step 8.‘Band Name’ is the next box where we will enter the band name as ‘Band 2’ as per below image.
hr add employee band

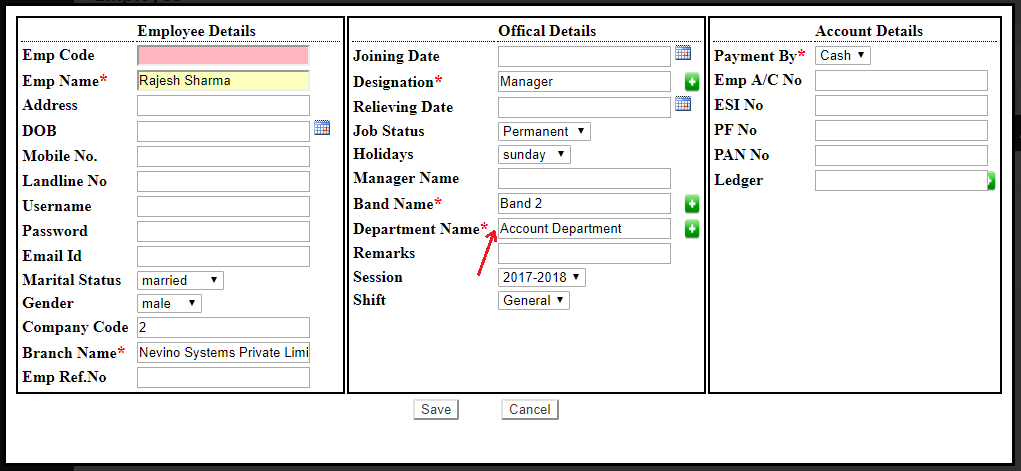
Step 9.Next box is ‘Department Name’ and here we willenter department name as ‘Account Department’. 
add employee department

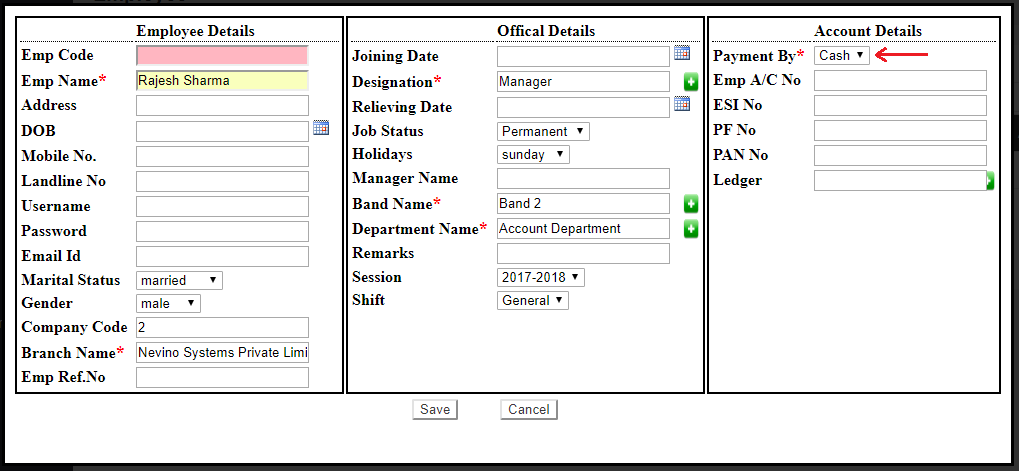
Step 10.Now we move to the ‘Account Details’ section in which you can define the medium of salary to employee. First you can see ‘Payment By’ as ‘Cash’ which is used to pay employee by cash as shown in image below.
hr employee salary in cash

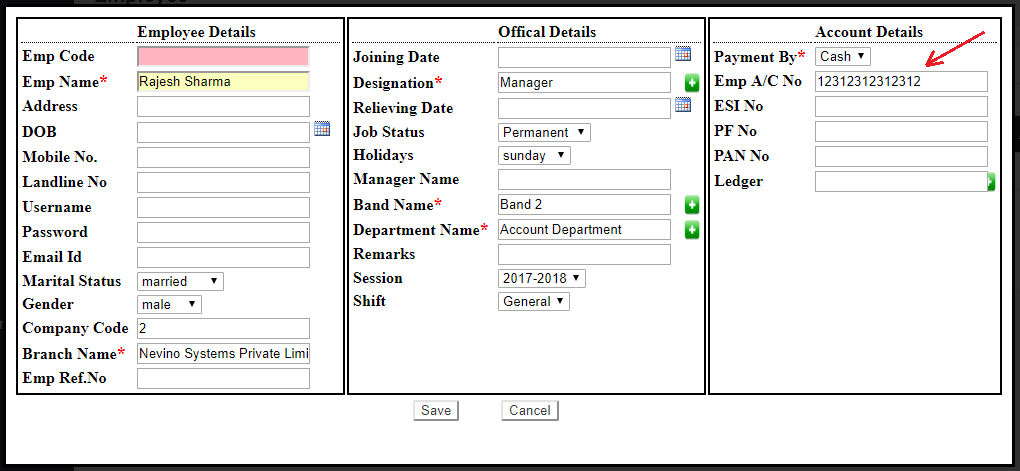
Step 11. If you want to pay employee in Bank account then you can enter the bank account number in box given with ‘Emp A/c No.’ as shown in image below.
hr employee salary in bank

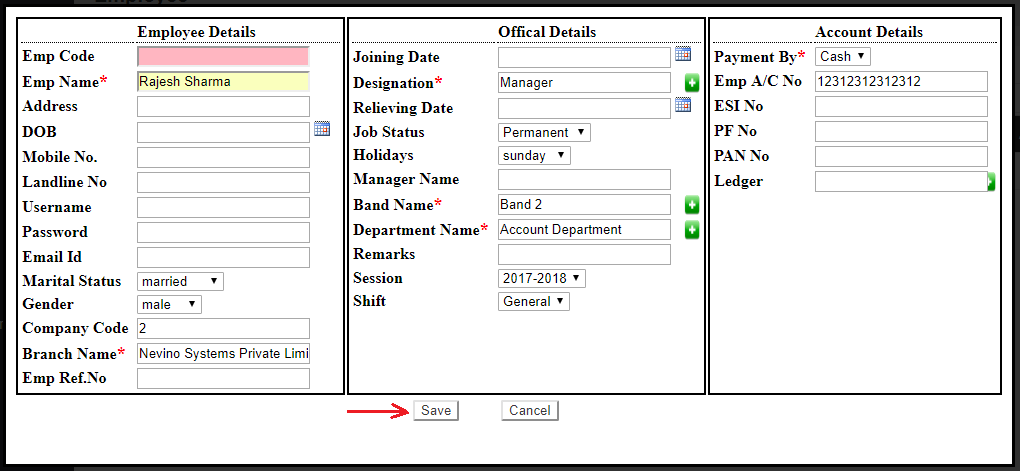
Step 12. After filling all the details click on save button as indicated in image below.
hr employee save button

Step 13. On the click of ‘Save’ button entered data will be saved and new window will appear on which you can see name of the employee as per image below. In this way you can add employee in Nevino HR Software.
hr employee name displayed

* The Content stated above is for informational purpose only. Expert Software Team is not responsible if any part of content found meaningless in any manner or condition.
How to add Band type leave in Nevino HR Software

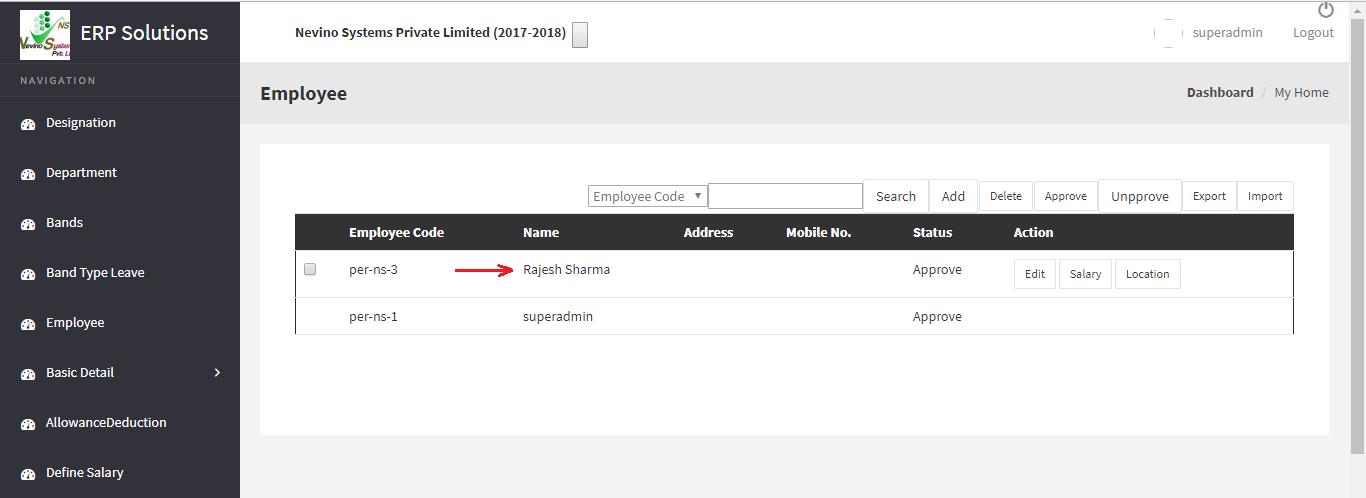
Nevino HR Software is equipped with functionality to assign different type of leave to every band type particularly. So, in this blog we will learn how we can add band type leave in Nevino Hr Software.

Step 1. Let’s start from the main window of Nevino HR Software where you must click on ‘HR’ Icon as shown below.main hr dashboard

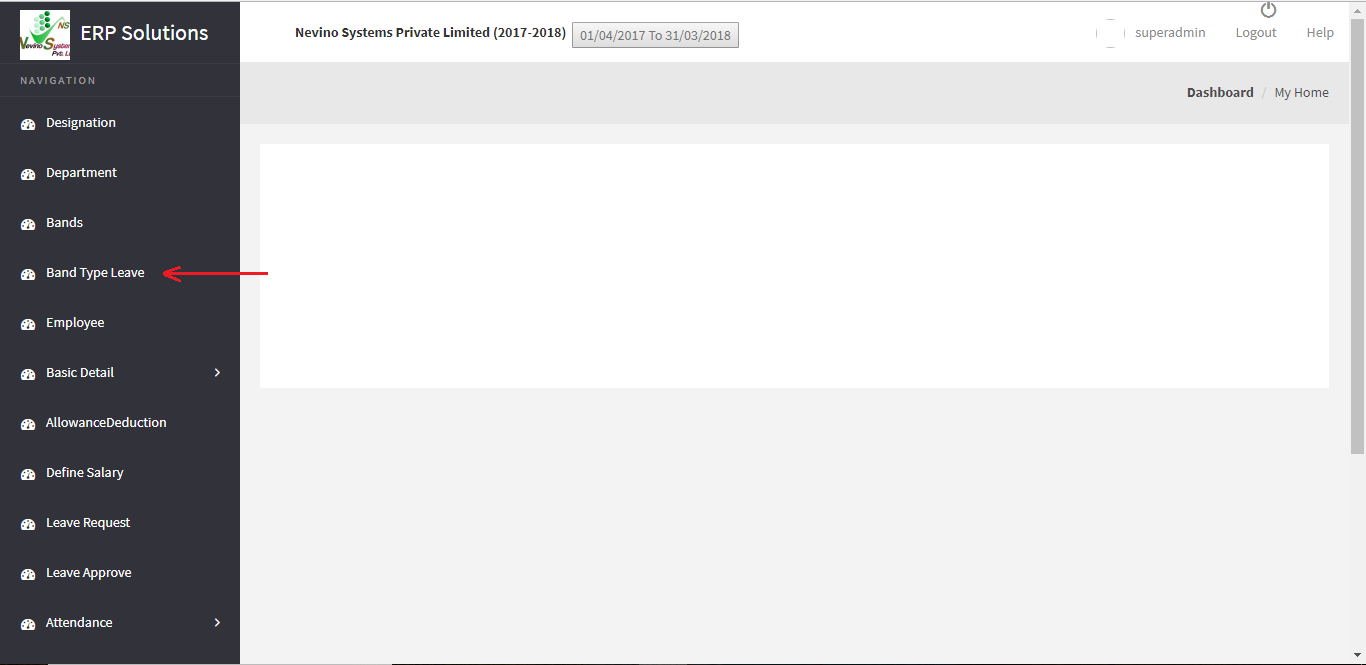
Step 2.  Now click on ‘Band Type Leave’ in the menu as indicated in image below.
hr band type leave

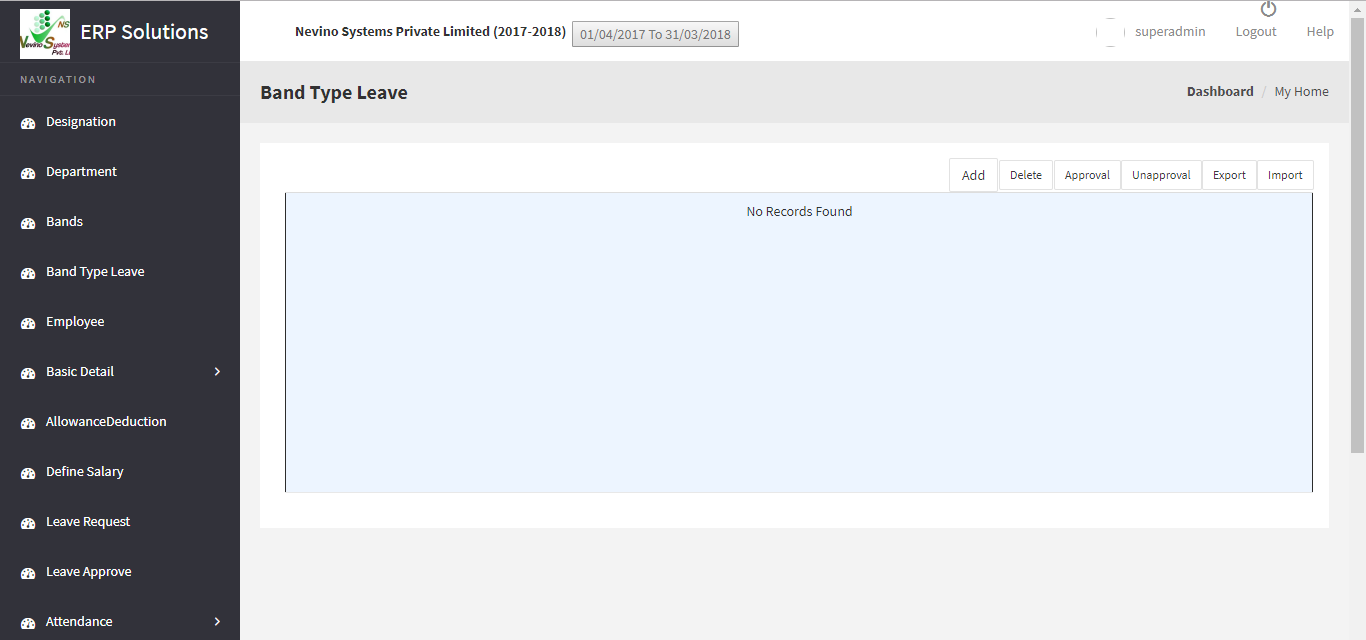
Step 3. On the click of ‘Band type leave’ window as below will appear which is the main window of ‘Band type leave’.
hr band type leave screen

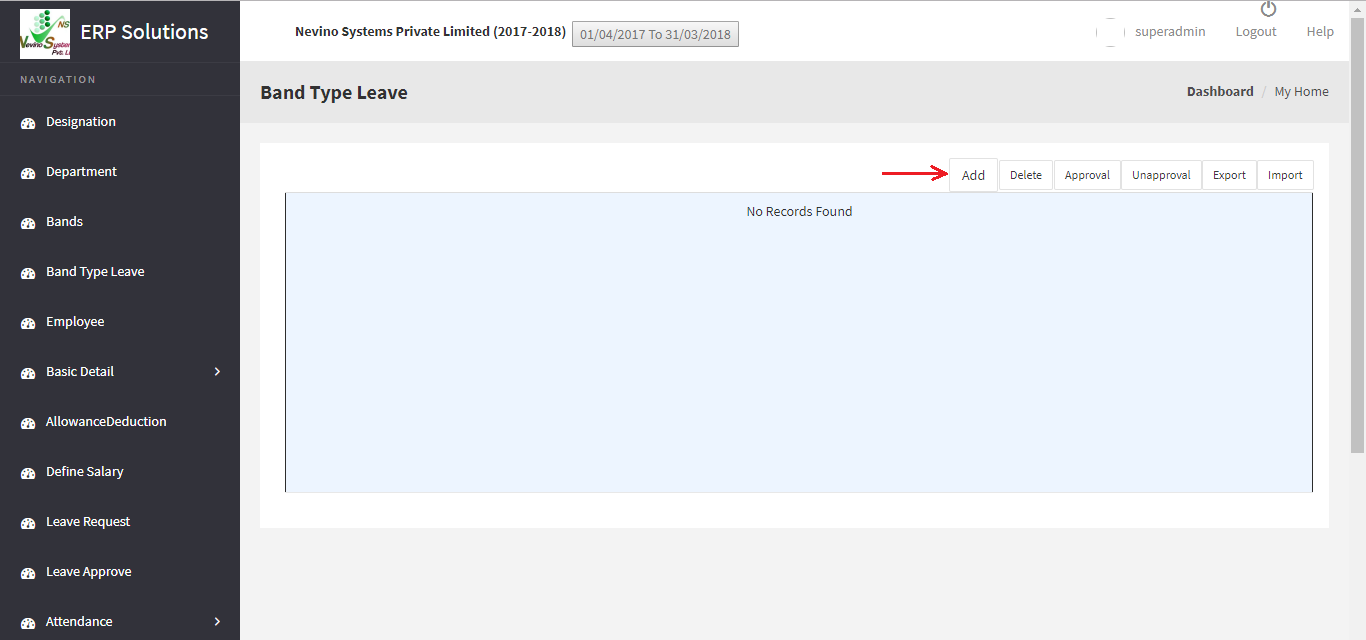
Step 4. In this window click on ‘Add’ button as shown in image below.
hr band type leave add button

Step 5. When ‘Add’ button is clicked a new window will appear as shown below.
hr band type edit screen

Step 6. Now enter the band name for example we will add ‘Band 2’ as per image below.
enter band name

Step 7. Next, we select the Leave Type by clicking on drop down list where three types of leaves are appearing.
hr select leave type

Step 8.For example, we will select ‘Earned’ leave as shown below.
hr leave type selected

Step 9. Next enter the count of leaves to be given to ‘Band 2’ so for example we will enter ‘10’ as number of leaves.
hr enter  leave count

Step 10. Now click on ‘Save’ button as shown below in image.
hr band type save button

Step 11. On click of ‘Save’ button leave type will be saved and new window as below will appear where you can see ‘Band 2’ with leave type ‘Earned’ of leave count ‘10’. In the same way other two types of leaves can be assigned to ‘Band 2’.
hr band type leave created

* The Content stated above is for informational purpose only. Expert Software Team is not responsible if any part of content found meaningless in any manner or condition.
How to edit Bands in Nevino HR Software

Whenever there is change in bands inside organization then it is very easy to change bands name in Nevino Hr Software. So, lets learn how we can edit the bands in Nevino Hr Software.

Step 1.We start from the main window of Nevino HR Software where you must click on ‘HR’ icon as shown below.
main hr dashboard

Step 2.When window as below appears then click on ‘Bands’ as indicated below.

Step 3. After clicking on bands window as below will appear where you can see ‘Band 1’ as band name. Now click on ‘Edit’ button as indicated below.
hr bands edit button

Step 4.On click of ‘Edit’ button new screen as below will appear.
hr band main dashboard

Step 5.For example, we want to change band name from ‘Band 1’ to ‘Band 2’ so we will enter band 2 as shown below.
hr new band name screen

Step 6. Now we will click on ‘Update’ button as indicated in image below.
hr band update button

Step 7.On click of ‘Update’ button data will be saved and ‘Band 2’ will be shown as below image. In this way we can edit bands in Nevino HR software.

hr new band created

* The Content stated above is for informational purpose only. Expert Software Team is not responsible if any part of content found meaningless in any manner or condition.
How to add Bands in Nevino HR Software

Every designation of an organization is identified by its Band and according to that authority inside the organization is given to an employee. So now we learn how we can add bands in Nevino Hr Software.

Step 1. Click on the HR Icon as displayed in image below.
main hr dashboard

Step 2. Now click on ‘Bands’ as indicated in image below.
select hr band

Step 3. On the click of ‘Bands’ a new window will appear as below.
band main hr window

Step 4. This is the main window of ‘Bands’ and here you have to click on add button as indicated in image below.
bands hr add button

Step 5. On click of ‘Add’ button a new window as below will appear.
hr band main window

Step 6. Now enter the band name as per your requirement in the blank box provided. For example, we will add band name as ‘Band 1’ as shown in image below.
hr band name entered
Step 7. When you have entered the band name click on ‘Save’ button as shown below.
hr band save button

Step 8. On click of ‘Save’ button the data will be saved, and a new window will appear on which you can see your entered band name as shown below.
hr band name created

* The Content stated above is for informational purpose only. Expert Software Team is not responsible if any part of content found meaningless in any manner or condition.
How to edit department in Nevino HR Software

Whenever there is need arises to edit the Department name below mentioned steps can be followed to do the needful. So how to edit department name in Nevino Hr Software is as follows.
Step 1. From the main window of Nevino HR Software click on ‘HR’ icon as shown below.
main hr dashboard

Step 2. When window as below appears click on ‘Department’ as indicated in screen shot below.
select hr department

Step 3. Now a window as below will appear where you can see a department name appearing as ‘I.T.Department’.
department main hr window

Step 4. As we want to edit the department name so click on ‘Edit’ button as indicated in image below.
hr department edit button

Step 5. On click of ‘Edit’ button a new window as below will appear. In this window you can change the department name and department head.
hr department edit window

Step 6. For example, we will change department name as ‘Account Department’ as shown in image below.
enter hr department name

Step 7. Now we will click on ‘update’ button as indicated in below image.
hr department update button

Step 8. On click of update button newly entered data will be saved and window as below will appear where you can see changed department name as ‘Account Department’.

* The Content stated above is for informational purpose only. Expert Software Team is not responsible if any part of content found meaningless in any manner or condition.