What is Selenium Web Driver ?

What is Selenium Web Driver ?

Selenium WebDriver is a web automation framework that allows you to execute your tests against different browsers, not just Firefox, Chrome (unlike Selenium IDE).

WebDriver allows engineers to use a programming language in creating your test scripts which is not  possible in Selenium IDE.

Engineers can now use iterations logics and conditional operations.

This platform supports multiple languages Java, C#, PHP, Python, Perl, Ruby

Pros

  • Simple installation compared to RC.
  • Communicates directly to Browser Unlike RC.
  • Browser Interaction is more realastics.
  • Fast Execution time than IDE and RC.

Cons

  • Installation is complicated than IDE.
  • Need Knowledge of Programming.
  • Can not support new browsers.
  • Has to code for test results and logs.

Summary

  • Selenium WebDriver is a tool for testing web applications across different browsers using different programming languages.
  • WebDriver allows engineers to use a programming language in designing your tests thus give power to script.
  • WebDriver is faster than Selenium RC because of its simpler architecture.
  • WebDriver directly talks to the browser.
  • WebDriver’s API is more concise.
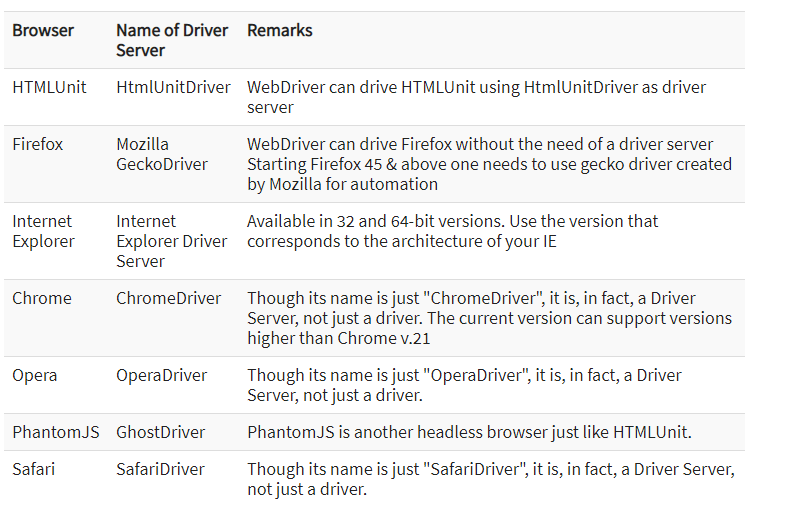
  • WebDriver can support HtmlUnit.
  • Web Driver cannot readily support new browsers.
  • Web Driver does not have a built-in command for automatic generation of test results.

* The Content stated above is for informational purpose only. Expert Software Team is not responsible if any part of content found meaningless in any manner or condition.
Selenium Tutorials for beginners

Selenium Tutorials for beginners

Selenium is the open source web based automation tool. In this tutorials you will cover basics as well as advance features. Below are few topics which we are going to cover

What is Selenium ? Brief introduction about Selenium

What is Selenium Web Driver ?

How to Download and install Selenium Web Driver ? 

What is C# ?


* The Content stated above is for informational purpose only. Expert Software Team is not responsible if any part of content found meaningless in any manner or condition.

What is Selenium ? Brief introduction about Selenium

What is Selenium ? Here is Brief introduction about Selenium

What is Selenium ? Selenium is a open source automated testing tool for web applications across different browsers and platforms. Selenium focuses on automating web-based applications.

What is Selenium Testing? When an test engineer perform testing using selenium tool is called Selenium Testing.

Selenium has 4 components

  • Selenium Integrated Development Environment (IDE) : a Firefox add-on that you can only use in creating relatively simple test cases and test suites.
  • Selenium Remote Control (RC) – Selenium 1 refers to Selenium RC : also known as Selenium 1, which is the first Selenium tool that allowed users to use programming languages in creating complex tests.
  • WebDriver : the newer breakthrough that allows your test scripts to communicate directly to the browser, thereby controlling it from the OS level.
  • Selenium Grid : is also a tool that is used with Selenium RC to execute parallel tests across different browsers and operating systems.

Selenium RC and WebDriver are merged to a single framework to form Selenium 2.

Selenium is more profitable than QTP in terms of costs and flexibility. It also allows you to run tests in parallel, unlike in QTP where you are only allowed to run tests sequentially.

Selenium Integrated Development Environment

Selenium Integrated Development Environment (IDE) is very simple(easy to learn) framework in the Selenium suite. For this we need to install Firefox plugin. However, because of its simplicity, Selenium IDE should only be used as a prototyping tool. For more advanced test cases, we need to use either Selenium RC or WebDriver.

Pros

  • Easy to use
  • easy to install
  • No Programming experience required
  • Only HTML Knowledge
  • Front built in interface for Test Results

Cons

  • Available in Firefox Browsers
  • Create only Prototype tests
  • No support Loop and conditions
  • Execution is very slow compared with RC and Web Driver

Selenium Remote Control (RC) – Selenium 1 refers to Selenium RC.

Selenium Remote Control is first automated web testing tool that allowed developers to put programming concepts like looping , conditions etc. This platform supports multiple languages Java, C#, PHP, Python, Perl, Ruby

Pros

  • Supports Loop and Conditions
  • Support data driven testing
  • Support new browser
  • Fast against IDE
  • Cross browser Platform

Cons

  • Installation is more complicated
  • Needs Selenium Remote Control Server in running mode
  • Need Programming Knowledge
  • API Contains redundant and Confusing Command
  • Inconsistent Results
  • Slower against Web Driver

Web Driver

The WebDriver is better than both Selenium IDE and Selenium RC. Its implements a more modern and stable approach in automating the browser actions. WebDriver does not rely on JavaScript for Automation. It controls the browser by directly communicating with it.

This platform supports multiple languages Java, C#, PHP, Python, Perl, Ruby

Pros

  • Simple installation compared to RC
  • Communicates directly to Browser Unlike RC
  • Browser Interaction is more realastics
  • Fast Execution time than IDE and RC

Cons

  • Installation is complicated than IDE
  • Need Knowledge of Programming
  • Can not support new browsers
  • Has to code for test results and logs

Selenium Grid

Selenium Grid is a tool used together with Selenium RC to run parallel tests across different machines and different browsers all at the same time. Parallel execution means running multiple tests at once.

It is having some great Features as follows

  • Nice Performance in terms of execution speed
  • Enables simultaneous running of tests in multiple browsers and environments.
  • Saves time enormously.
  • Follow hub and nodes concept. The hub acts as a central source of Selenium commands to each node connected to it.

* The Content stated above is for informational purpose only. Expert Software Team is not responsible if any part of content found meaningless in any manner or condition.

How to register on Refer & Earn Mobile App

How to register on Refer & Earn Mobile App?

Step 1 :  Download Refer & Earn App using Google Play Store
Step 2 : Launch the App from your Mobile
Step 3 : Click Signup
Step 4 : Fill the form and Submit it
Step 5 : You will be redirected to Login page
Step 6 : Login Now
Step 7 : Go To My Profile
Step 8 : Go to Verify Mobile
Step 9 : Enter your mobile
Step 10 : Wait for OTP In case You dont receive OTP and resend it
Step 11 : Enter OTP
Step 12 : You are fully registered with App now
Step 13 : Enjoy Earning !!!!

Note :
Register with permanent mobile number as number can not be changed in future
Without mobile verification you will never get any cashback
Cashback Varies from Vendor to Vendor

* The Content stated above is for informational purpose only. Expert Software Team is not responsible if any part of content found meaningless in any manner or condition.

How to earn income on Refer & Earn Mobile Application

How to earn income on Refer & Earn Mobile Application?

Refer & Earn is an app which is specially designed to earn income from home

You can earn income using below methods

1. Refer & Earn : Suppose in your known , there is anyone who need any type of mentioned services (screenshot of service page ) Just refer him as a lead using refer & earn module. And you can ask status on each lead by giving comments. If any lead is approved then you will get respective points on your profile and you can easily transfer this points to your bank

2. Pay & Earn : These days we are open and agreeing all vendors request to promote without any charges. Just we need good scheme from vendor which we can pass to our registered users. So now question is : How to earn income using pay & earn module

  • Suppose you attached refer & earn with vendor A on 20% scheme.
  • Vendor A is attached to Refer & Earn system by You
  • you will get incentive of 2% on all transactions made at Vendor A paid by Refer & Earn
  • user B made an transaction at Vendor A and pay 1000 Rs using Refer & Earn App.
  • Then automatically your wallet will be credited by 20 points.
  • Second Income : if user B is also reffered by you then you will get 1% extra means 10 more points
  • Total of 30 points you have earned on one transaction made by user B to Vendor A
  • Thus As many vendor and user you will refer to Refer & Earn , You will get more income

Buy & Earn Module : Here you will get complete shopping portal and this will be launched soon.

Download App from : Google Play Store

How to register on Refer & Earn Mobile App ?

* The Content stated above is for informational purpose only. Expert Software Team is not responsible if any part of content found meaningless in any manner or condition.

how to Prepare an android app for release in flutter


how to Prepare an android app for release in flutter?

Step 1 : First review the app manifest file 

in case of flutter you will get app manifest file here at location <app dir>/android/app/src/main


step 2 : Please check your package name this will be your app unique id in playstore ( How to change package name in flutter


step 3 : Please check permission in same file  Android Manifest file 

Internet permission should be there if your app need an internet access. if your app does not need internet access then remove the internet permission line 

step 4 : Review the build configuration in file build.gradle at folder location <app dir>/android/app/


step 5 : check the default id in build.gradle file . This should be matched with Android Manifest file package name. You can change minsdkversion and targetsdkversion here only. In case of flutter versioncode and version name will be picked from pubspec.yaml file. 


step 6: Add the launcher icon 
add dev dependency in pubspec.yaml  and place icon.png under images folder
flutter_launcher_icons: ^0.7.3
flutter_icons:
  android: "launcher_icon"

  ios: true

  image_path: "images/icon.png"
see below screenshot for clarity
run below commands
flutter pub get
flutter pub run flutter_launcher_icons:main
Step 7: sign the app by creating keystore file 

You need to sign the app digitally to upload it into playstore  
Run command 

keytool -genkey -v -keystore ~/key.jks -keyalg RSA -keysize 2048 -validity 10000 -alias key 

In My Case it is " C:\Program Files (x86)\Java\jdk1.8.0_151\bin>keytool -genkey -v -keystore E:\pro jects\flutterprojects\santeyalibota/key.jks -keyalg RSA -keysize 2048 -validity 10000 -alias key" 

step 8. reference the keystore file from the app 
create file at <app dir>/android/key.properties  
and load it with your data  
storePassword=<password from previous step> 
keyPassword=<password from previous step> 
keyAlias=key 
storeFile=<location of the key store file, e.g. /Users/<user name>/key.jks>

Note: Keep this file private; do not check it into public source control. 

step 9 : configure signing in build.gradle file

Replace:

android {
with the keystore information from your properties file:

def keystoreProperties = new Properties()
def keystorePropertiesFile = rootProject.file('key.properties')
if (keystorePropertiesFile.exists()) {
    keystoreProperties.load(new FileInputStream(keystorePropertiesFile))
}

android {
  1. Replace:
    
    buildTypes {
        release {
            // TODO: Add your own signing config for the release build.
            // Signing with the debug keys for now, so `flutter run --release` works.
            signingConfig signingConfigs.debug
        }
    }
    
    
    with:
    
    signingConfigs {
        release {
            keyAlias keystoreProperties['keyAlias']
            keyPassword keystoreProperties['keyPassword']
            storeFile file(keystoreProperties['storeFile'])
            storePassword keystoreProperties['storePassword']
        }
    }
    buildTypes {
        release {
            signingConfig signingConfigs.release
        }
    }
    
Release builds of your app will now be signed automatically.

Step 10: Enable Proguard 

Create /android/app/proguard-rules.pro file and add rules listed below.

#Flutter Wrapper
-keep class io.flutter.app.** { *; }
-keep class io.flutter.plugin.**  { *; }
-keep class io.flutter.util.**  { *; }
-keep class io.flutter.view.**  { *; }
-keep class io.flutter.**  { *; }
-keep class io.flutter.plugins.**  { *; }
The configuration above only protects Flutter engine libraries.

Step 11 : Enable obfuscation

Open /android/app/build.gradle file and locate buildTypes definition. Inside release configuration set minifiyEnabled and useProguard flags to true. You have to also point ProGuard to the file you have created in previous step

android { ... buildTypes { release { signingConfig signingConfigs.release minifyEnabled true useProguard true proguardFiles getDefaultProguardFile('proguard-android.txt'), 'proguard-rules.pro' } } }

Note: Obfuscation and minification can extend compilation time of the Android application.

Step 12 : build the release apk

Using the command line:
  1. cd <app dir> (replace <app dir> with your application’s directory).
  2. Run flutter build apk (flutter build defaults to --release).
The release APK for your app is created at <app dir>/build/app/outputs/apk/release/app-release.apk.

Step 13 : install the release apk on a device

Connect your Android device to your computer with a USB cable.

cd <app dir> where <app dir> is your application directory

Run flutter install .

Step 14 : Publishing an APK to the Google Play Store

Thats it 


* The Content stated above is for informational purpose only. Expert Software Team is not responsible if any part of content found meaningless in any manner or condition.

How to Remove the System Volume Information Folder from a Pen Drive

First  You note the drive letter in the pendrive For example  G: or L: or F:

Open Command Prompt (search cmd or press Windows Key+R).Open command prompt (Run as administrator)Now we type drive letter  G: and hit the enter

Now we will type in command prompt   rmdir “system volume information” /s /q  and hit enter.

After this process we will open pendrive or flashdrive and confirm that the folder is no longer present.

* The Content stated above is for informational purpose only. Expert Software Team is not responsible if any part of content found meaningless in any manner or condition.